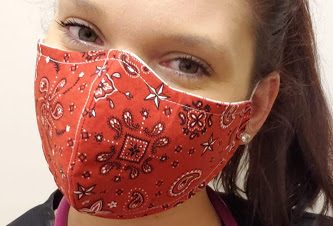
I have had requests to share a pattern for the masks I am donating. This pattern was originally found on the Craft Passion website. I give all the credit possible to this site for the original pattern. After making a bunch of the masks, I have tweeked the pattern to be a bit more fitted. Now I am super happy with the fit, and it is a very easy pattern to assemble.

I’ve already sewn over 150 face masks to give-away to friends and family. This is not a medical mask, but a mask to use for home, grocery shopping, etc. However, it is very easy to adapt this pattern to add a pocket on the back to hold an N95 filter.

Download the FACE MASK PATTERN HERE. Set your printer at CUSTOM 100%. Make sure the little box on the pattern measures 1 inch square.

- Cut 2 main fabric pieces, 2 lining pieces, and 2 fusible interfacing pieces. I use the same interfacing used for T-shirt quilts. The interfacing is optional.
- Fuse the interfacing to the back of the 2 main fabric pieces.
- Sew the seam at the front of the 2 main pieces, and the front of the 2 lining pieces.

4. Clip the curves on both pieces, then press the seams towards one side. Topstitch 1/8″ from the seam on the Main piece only. I am using white thread so you can see the topstitching.

6. Pin the lining to the main piece, right sides together.

7. Press under 1/4″ along the lining and main fabric pieces, just on one end of the mask. The other end will be sewn shut.
8. Sew all the way around the mask, leaving the one end open for turning.

9. Clip the curve by the nose area.

10. Turn the mask right side out through the turning hole on the side. A turning tool or knitting needle is helpful. Press.

11. Top stitch 1/4″ from the edge.

12. Press under each end on the “FOLD” line shown on the pattern. Place a 9″ piece of Round Cord Elastic under the flap and stitch the flap down. On this mask I am using 2mm elastic, but 1mm also works fine.

13. Tie a knot in the elastic .

14. Pull the knot into the channel created by the fold.

This mask fits an adult female. Men may need a longer elastic. If the mask is too small for a man, increase the size of the pattern by about 1/4″ along the top and sides for a man, decrease 1/4″ for a child’s size.


Let’s keep everyone safe! Happy mask making.


Bookmarked!, I enjoy your web site!
why not just give diagram instead of having to download please
Hi Christine, We generally use downloads so the reader can get an accurate PDF of the pattern. To my knowledge, it is the best way to share a pattern. Even if I send this pattern to you via your email address, I still think it will come to you in the form of a download 🙁
Thank you for the PDF file. It’s the only way I know to download so I have a reference
Could you please send me the pattern to my email.
My name Carol and I have heart disease, ms , and a few others. My husband is terminal and I really need this pattern it won’t download on my kindle
Thank you for sharing
Could you please send me the pattern to my email. the.koch.family5@gmail.com. My name Carol and I have heart disease, ms , and a few others. My husband is terminal and I really need this pattern it won’t download on my kindle
Thank you for sharing
I just made one of these using your pattern and viewable instructions. Super easy and fast
Cant get pattern to download. Click and nothing happens.🤔
Email me directly and I will send the file directly to you:
maryannhertel@gmail.com
Love the design but can’t download pattern on my phone. Can you please email paternity to bvelez@buffaloschools.org. Come fall I may have to see masks for students at my school. Thank you
Done!
Thanks for the nice pattern! Is it missing step 5 or is it just misnumbered?
Best mask pattern ever! My only struggle is trying to make other sizes. I so much appreciate you sharing the pattern and instructions!
Hi Amanda, I usually add 1/4″ all the way around for the men’s size, and subtract 1/4″ for the kids size.
I made three today and have three more cut out. They really do fit better than others I made. I lay the elastic in the fold and sew…then tie the knot.Wish I had a Lucite template.
So glad you like the fit!
Can you email a pattern for this mask to me.. I am interested in trying it as the other ones I’ve tried don’t fit well. Thanks
I would need your email.
Could you email a pattern for your mask please?
my email is dianakay42@yahoo.com
Thank you.
Thank you for the mask pattern
Free pattern mask 101