Welcome to “12 Days of Christmas in July”. On my post today you will find a FREE tutorial on paper piecing AND a Give-Away at the end of this post.
Thank you to Sarah Craig from Confessions of a Fabric Addict for hosting this blog hop!
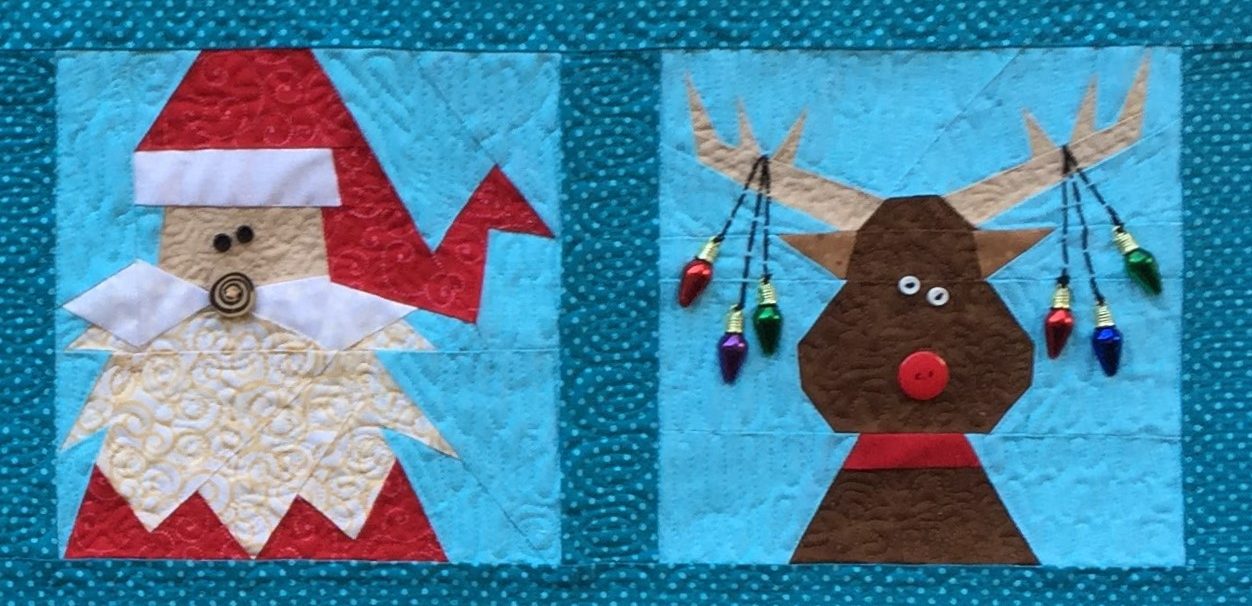
![]() I love designing paper piece patterns for the holidays. I am sharing a tutorial on paper piecing today using one of my new Christmas patterns. “Must Be Santa” can be made into a table runner or pillow if you follow the directions in the pattern. However, you can use the four 7 1/2″x 7 1/2″ blocks in this pattern for any number of projects.
I love designing paper piece patterns for the holidays. I am sharing a tutorial on paper piecing today using one of my new Christmas patterns. “Must Be Santa” can be made into a table runner or pillow if you follow the directions in the pattern. However, you can use the four 7 1/2″x 7 1/2″ blocks in this pattern for any number of projects.

This table runner is made using the four blocks in the pattern, Elf, Mrs. Claus, Santa Claus, and Rudolph. The pillow below is also included in the pattern.
 For my tutorial, I will be using this Santa block, but any block in the pattern may be substituted.
 I have designed many Santa blocks. This 1 is my favorite. I pride myself in offering very EASY patterns with just a few pieces. This particular block is NOT one of my easy blocks. It has a number of different sections that must be paper pieced separately, then sewn together to complete the block. Don’t let this deter you from trying paper piecing if you are a beginner. Each segment is fairly simple. So…let’s take this 1 step at a time…
 Start by setting your stitch length to 1.5; that’s about 20 stitches per inch. Shortening the stitch length perforates the paper so as to make it easier to rip away the paper pattern when you are finished with the block.
Make 4 copies of the original pattern and cut around each segment (outlined in red lines) adding a 1/4″ seam allowance around each segment. Cut segments A/F from copy 1, segments B/E/I from copy 2, segments C/D/G from copy 3, and segment H from copy 4. Above you can see segments A, B, and C with the 1/4″ seam allowance around each piece. Now you are ready to start piecing!
 Let’s start with segment A. Pin piece #1 to the appropriate fabric (background color), wrong sides together. There should be at least 1/2″ of excess fabric all the way around piece #1. You can check this by holding your pattern up to a light source.
 Trim the excess fabric. Double check: The WRONG SIDE of the fabric should be facing the back of the pattern. This scrap is a 1/2″ larger than piece #1.
 Find the stitching line between piece #1 and piece #2.
 Use a bookmark or any piece of card stock to fold back piece #2 along this stitching line. It’s a bit hard to see because the bookmark and the back of the pattern are both white, but look closely to see how the pattern is folded.
 The Add-A-Quarter ruler is very handy for trimming seam allowances.
 Use an “Add-A-Quarter” ruler to trim away the excess fabric, trimming 1/4″ away from the stitching line (fold).
Piece #2 is skin color, so I am using a tea dye fabric. This scrap is a good 1/2″ larger all the way around than piece #2.
 Place the pattern on top of the skin colored fabric scrap so the trimmed edges (seam allowances) line up.
 Flip the pattern piece back down and pin in place. Sew on the seam line between pieces #1 and #2, starting and stopping your stitching 1/4″ before and after the seam line. There is no need to back tack, as each seam line will eventually be covered by another seam line.
 Flip the fabric behind piece #2 and press in place. I also like to pin it flat so there is no movement as you add the next piece.
 Looking at the pattern from the front, trim away any excess fabric from piece #2, but be GENEROUS with your seam allowance. I always allow for 1/2″ seam allowance; later to be trimmed to 1/4″. Piece #1 and #2 are now in place. Everything to complete segment A is now repeating these same steps.

Using the bookmark, fold the pattern back on the seam line between piece #2 and piece #3. Do you see that small 1/4″ seam projecting into piece #3…just to the right of my finger?
 That little seam needs to be ripped open so the pattern will lay flat when folded back onto the bookmark.
 Use the 1/4″ ruler to trim the seam allowance. Use a scrap of white for piece #3.
 You can see I am using a sparkly white fabric. Piece #3 is part of Santa’s mustache. Line up the outer edge of the seam allowances, right sides together.
 Flip the pattern open and pin in place.
 Sew on the line between piece #2 and #3, again start and end 1/4″ before and after the seam line.
 Flip the fabric behind piece #3, press, and pin in place.
 Trim away the excess scrap of white, leaving a generous 1/2″ around the edges of piece #3.
By using larger scraps and trimming AFTER sewing, you will not have to guess what size to cut your scraps to fit each piece.

Continue in this manner until segment A and B are completed.
 Trim the seam allowances that are between segment A and B to 1/4″.
 These are the 2 edges that are now trimmed and ready to be pinned together and sewn.
 Use a straight pin to poke into and line up the edge of the red seam line on segment A and the corresponding spot on segment B.
 Pin the 2 segments together.
 Sew on 1/4″ before and after the seam line. Rip away the paper in the seam allowance area on both segments. Open the segments flat and press, pressing both seams to one side or the other, depending on which way they want to lay.

The “Must Be Santa” pattern and many more of my patterns can be found on Etsy or Craftsy.
See more free tutorials on my Tutorial page, or visit Made By Marney on YouTube.
And now for the Give-Away! I will be giving away a free copy of my “Sew Yourself A Merry Little Christmas” book. This book is filled with adorable holiday paper pieced block patterns and 8 different patterns that use the blocks.

These are just a few of the 16 paper pieced blocks in this book.


 Due to the extremely high cost of postage overseas, I am only able to mail this book to a customer from the US. If someone wins from a foreign country, I will download this Christmas pattern to them, instead of the book: Must Be Santa Table Runner/Pillow pattern.

For a chance to win the free book (or pattern if you live overseas), leave a COMMENT on this post. Please make sure your email is included. The winner will be announced on Thursday, July 26.
Please visit other participating designers and quilters:
Saturday, July 14th
Joy @ Days Filled With Joy
Selina @ Selina Quilts
Sunday, July 15th
Joanne @ Everyone Deserves a Quilt
Jan @ The Colorful Fabriholic
Monday, July 16th
Carole @ From My Carolina Home
Jamie @ L’Fair Quilts
Karen @ Tu-Na Quilts, Travels & Eats
Tuesday, July 17th
Sharon @ Vrooman’s Quilts
Mary @ Made by Marney
Wednesday, July 18th
Karrin @ Karrin’s Crazy World
Marian @ Seams To Be Sew
Thursday, July 19th
Christina @ Christina’s Handicrafts
Sherry @ Books, Hooks, Sticks, etc.
Danice @ Homespun Hannah
Friday, July 20th
Kristi @ Confessions of A Fabric Addict
Wendy @ Pieceful Thoughts
Saturday, July 21st
Cindy @ Stitchin’ At Home
Meloney @ Mel’s Quilting Blog
Sunday, July 22nd
Anja @ Anja Quilts
Moira @ Quilted Snail
Monday, July 23rd
Brenda @ Songbird Designs
Amy @ Sea of Estrogen
Bonnie @ In Stitches With Bonnie
Tuesday, July 24th
Kathy @ Kathy’s Kwilts and More
Summer @ Summer Lee Quilts
Wednesday, July 25th
Susan @ Quilt Fabrication
Brandy @ Pampered Pettit
Jean @ All Points of the Compass
Linking with:


I ordered your Wheaten terrier pattern and loved it. Would love to win your book and start creating Christmas gifts for family and friends.
I love Santa. Such a sweet giveaway.
I really hope I win. Is that horrible to say? I guess you may know by now I love your patterns. This book has been on my list to get. Thanks for the paper piecing tutorial. Now I need to work on getting that pattern..robin..
quiltyladyrr@gmail.com
Love all your patterns! Santa is my favorite!
What a delightful set of designs! Those are so cute. Thanks for sharing.
Such a beautiful and creative block. I have been paperpiecing lately and enjoy the process
Would love to win
Wow these are great projects – thanks for sharing.
Such a sweet Santa and the book looks wonderful!
I love paper piecing, your patterns are adorable.
L💝VE your paper piecing patterns!
cwyseg@gmail.com
Great and fun looking Santa! What a fun and modern way to brighten him up!
These are soooo cute! Thanks for the chance for a giveaway of these patterns.
The paper pieced designs are very fun.
Paper piecing is not my thing, but sometimes it needs to be done to get what you want! Your patterns are so cute, I might be convinced I needed to tackle the dreaded technique again.
Such clear instructions for paper piecing. Thanks. Janice.snell@gmail.com
Your paper pieced blocks are just so cute. These are blocks to try to do. A pillow is a good first project.
Your patterns are always so adorable!!
I love to do paper piece projects. thanks for the chance to win this cute book. Love your project you shared.
I love your designs. Your paper piecing tutorial is so helpful. Thanks for a great giveaway.
I love foundation paper piecing. I’m new to your site from the blog hop. Thanks for the giveaway. grinnie1961 at gmail dot com
Great tutorial. Thanks for the giveaway.
Gosh you have cute designs. I have never paper pieced and know I’ll be giving it a try. I’m also going to check your other patterns.
I enjoy paper piecing, great tutorial for those just beginning. I’d love to have your book, thank you for the opportunity!
Love the fun Christmas patterns. Thanks for the PP tutorial and for sharing.
This is a great project, I would love a pillow made using four of the blocks. I’ve am just beginning to learn paper piecing and at first glance, the Santa looks intimidating. However, your tutorial makes it so easy to understand. Thanks for sharing!
Your paper piecing is beautiful. The book looks really good. Would love to win it. My blog has a link to my contact form, just below the header, a round grey image with an envelope on it.
Wow… your pieces are so small. I love how you create faces with expressions.
Oooh, I could make some of these as Christmas presents! Put my name in the drawing, please.
The pillow is adorable! Love your patterns! Thanks for such a clear tutorial on paper piecing!
I am so thrilled to see your tutorial and block in the block of the month.. Thank you for all your skilled steps to follow…
You are one very talented lady. Love the patterns and your tutorial was a very clear introduction to paper piecing. Thanks
would love to win this book ,will have to watch out for it in my local quilt store.thanks for the chance to win . hjrogers@sympatico.ca
Your tutorial was great and that Santa, bear, reindeer…love them all! Thanks for sharing!
What a fun pattern. Thank you for sharing.
Paper piecing is a favorite of mine, but I’ve learned that I need to keep at it to remember the tricks and tips! My mind doesn’t retain those too well! I’d love to make your sweet Christmas book!
That IS a wonderful Santa, thanks for the chance to win your book.
Terrific instructions for us newbies. Thanks for the giveaway
Your book sounds perfect. Paper piecing is fun most times. Your Santa pillow is great. Thanks for sharing and thanks for the give away.
this is adorable – love Rudolph – very cute
I love paper piecing and your designs.
I love to paper piece and your patterns.
oh my gosh!! these patterns are ADORABLE!! stucker1261 at gmail dot com
Lots of work went into creating that tutorial for the adorable Santa. That button is perfect!
your pillow and table runner are so sweet and fun. thanks for sharing.
I have not done much paper piecing. . . I have to re-invent the wheel each time to make sure that I am doing it right. I’m guessing that if I did it more often it would become easier.
Usually I just blame it on being left-handed. LOL
Thank you for a fun tutorial.
Hi Sherry,
When I first started paper piecing, I always kept a good tutorial handy to remind me how to start…it was like a handy jump start reminder. Paper piecing is like “sewing backwards”. Keep up your great efforts. After a bit, it will become habit.
Love this Santa! He’s really awesome. The book looks amazing. Thank you for the chance to win it.
Thanks for offering a copy of your book a a prize during the 12 Days of Christmas in July Blog Hop!!
Love your patterns, and your tutorial is very good. I enjoy paper piecing. Thank you for a generous give away.
These are so adorable! Lovely tutorial as well. I always have to remind myself how to do paper piecing, but after a few minutes it all comes back.
I always enjoy your patterns and would love to make these cute Christmas blocks. Thanks for the chance to win!
While I’m not a paper piecer, (is that even a word) I just had to tell you, your work is beautiful and patterns are so cute. But please don’t include me in your great giveaway.
I love your patterns and have made a few already! Great fun!
Love all your patterns, particularly Santa! Great tutorial!
I LOVE all of your spare piecing patterns. I took a few few extra minutes to browse around your blog and really fawned over all of your sweet designs!
Cute cushion, and table runner! I love your patterns!! Would love to win too 😉
Your patterns are adorable! Thanks for sharing!
Susan
Susanpshaffer@gmail.com
This looks like fun to make. Your book looks like it could provide some great gifts for Christmas.
Love the patterns from your book. The reindeer is so cute with the lights hanging from the antlers! The runner would be cute as a bedrunner at the end of a child’s bed at Christmas. ndfromsd(AT)gmail(DOT)com
Hi, I have never been to your blog before and wow, I find you amazing! Bright patterns, I love paper piecing and will explore your shops. Great Job!
Julie
Thanks Julie…and welcome!
Just love these cute Christmas characters. So many of them and each one is darling. First I just saw the Santa, and loved that… and then there were more. Did I even see a tree skirt made of them?
Hi Debbie, Thanks for stopping by! No tree skirt pattern showing those blocks, BUT I have a tree skirt pattern in my Christmas book that would be adorable using these blocks…just sayin’
I haven’t done paper piecing in a long time. Maybe I will try it for a pillow. Thank you.
Adorable pillow and I love the runner tooo!!!!
Such fun Christmas projects! Thank you for your wonderful tutorials and chance to win your book.
I LOVE paper piecing! Your Christmas patterns are too cute and whimsical. Great tutorial.
Enjoy your designs, keep up the good work. Kathy in colo
Your Christmas patterns are adorable as are all of your patterns. I have the cat patterns but haven’t made them yet.
Your patterns are so cute and the Christmas ones are no exception. Thanks for a chance to win a copy of your Christmas book.
That table runner is so cute.
I love to paper piece!! Cute table runner. Great Christmas ideas!!
That reindeer is super!
Thankyou for sharing your ideas and pattern. Very inspiring and a little pea green with envy at your talent!
Aaaaw, so sweet of you to say. Thank you.
Your patterns look really interesting. I would love to win the collection of Christmas patterns. Thank you for the opportunity.
This Santa (& friends) is so cute. Thanks for offering the drawing
Wow! What pretty patterns and a wonderful tutorial! I’m sure it took you quite some time to prepare it! I just finished my first paper piecing project and your tutorial was easy to understand! Great job!
I love your patterns
I have literally never done anything paper pieced, but a few of your patterns look pretty doable for me. I do want to learn how to paper piece. The thought of sewing the pieces on the lines of the papers and then folding them and tearing them apart from the papers really interests me. I have even bought the “add a 1/4” template ruler for paper piecing but just haven’t brought myself to do it yet. Thanks for the tutorials.
Jeri
Hi Jeri, I would love to be able to take credit for inspiring you to try paper piecing! Start with an easy “simple” block. That would be a block where all the pieces are in 1 block. Where you don’t have to piece 2 different segments, then sew them together. It’s good to start simple. Good luck!
I believe in Santa. I like paper pieceing once I get the block started. It’s always tricky for me to get the first piece sewn like I want it. I just saw a tutorial to use a light box to help with lining up your pieces on your paper. I’m going to try that since I do have two light boxes. One is very small and would be perfect for that. Thanks for a great tutorial. You are very generous with your giveaway. I really want to do some Christmas sewing this year and this would be a perfect start.
Hi Susan, Sounds like you are well on your way to mastering paper piecing. A trick I use…when I am in doubt of lining up my piece properly, I bend my pattern back along the sewing line and check that there is a large enough scrap under it. If it fits, it will also fit after being sewn and flipped into place. I hope that helps 🙂
Thanks for this great tutorial. I’ve never seen paper piecing pattern papers that are colored. That’s a really good idea.
hijoffe@gmail.com
So very cute!
Thank you for your tutorial. Paper piecing is something I’ve wanted to try for a long time. I’ve read your blog for several months and admire your designs.
The Santa pillow is so pretty! Thanks for the paper piecing tutorial. I’ve just started; well actually, I’ve done a few projects but I always need a refresher course. I’m still in the stage where I forget and trim away what I’ve already sewn down.
Karen, Even I still do that sometimes, and I paper piece every day!
Oh my goodness, those patterns are just too cute! I love to paper piece, and your tutorial is so thorough. One tool I love to use with paper piecing is my Hera marker, to crease the paper to help when folding it back. Makes it much easier. My project for the hop, coming up on Friday, is paper pieced as well!
Hi Wendy, Thanks for the tip about the Hera marker. I will have to try it!
I love the polar bear, and the elf, and santa
What cute Christmas patterns
Love the Santas!
Thank you for great tutorial and the chance of a super giveaway
Love the pattern, but I’ve never tried paper piecing. Winning would provide a great opportunity to try it out! Thanks!!
I love Rudolph!! I especially like your animal patterns!
barbkaup(at)(yahoo)(dot)(com)
Your patterns are great! Thanks for the helpful tutorial!
My friend and I would love to win your book. Paper piecing is what I do best.
Love paper piecing. Grands would love pillow.
What cute patterns are in your runner, and the ones from your book do look fairly simple and very cute. Thanks for sharing the way you do this. I don’t do much paper piecing and your tutorial is very informative.
Great tutorial! Thanks so much for sharing! Your paper pieced patterns are just lovely!! xx
I love your paper-piecing for Christmas. I just purchased a learn to paper-piece book on Amazon, and would love to win your book. This is something I’ve wanted to try for a while now! Thank you for sharing and for having this giveaway of your book. Hope i win!!!
I love your cute designs, the little elf is my favorite! Thanks so much for the tutorial!
That looks like so much fun to make!
I’m a fan of your charming patterns! Thanks for the chance to win a copy of your book.
I’ve made several of your free patterns as well as shared your site with guild members. Love to paper piece and your cute Santa is a delight.
Sharon, Thanks so much for your kind words. Also thanks for the shout out to guild members. I love giving presentations to guilds. Always a good time!
What an awesome Santa! I love the table runner. Thank you for sharing with us and for the chance to win a copy of your book.
Thank you so much for the gift-a-way opportunity! Your tutorial was SO thorough I really think I will have success in my first attempt.
Hi Marney, what a great pattern and tutorial. Thanks so much for linking up to TGIFF!
And thank you for hosting your sweet linky party.
Thank you for such a thorough tutorial! That Christmas runner is just amazing!
wow, lots of quilters wanting to paper piece. I understand why. It is fun, and the results are outstanding every time.
An adorable Santa face and an very informative paper piecing tutorial-thanks!
Thank you so much. Been wanting to try paper piecing!!
Great tutorial, and cute designs! I love your tip for coloring the back so you know what color comes next. Thank you for sharing and participating in the blog hop!
good stuff. I will make sure to bookmark your blog. https://newone2017.com/