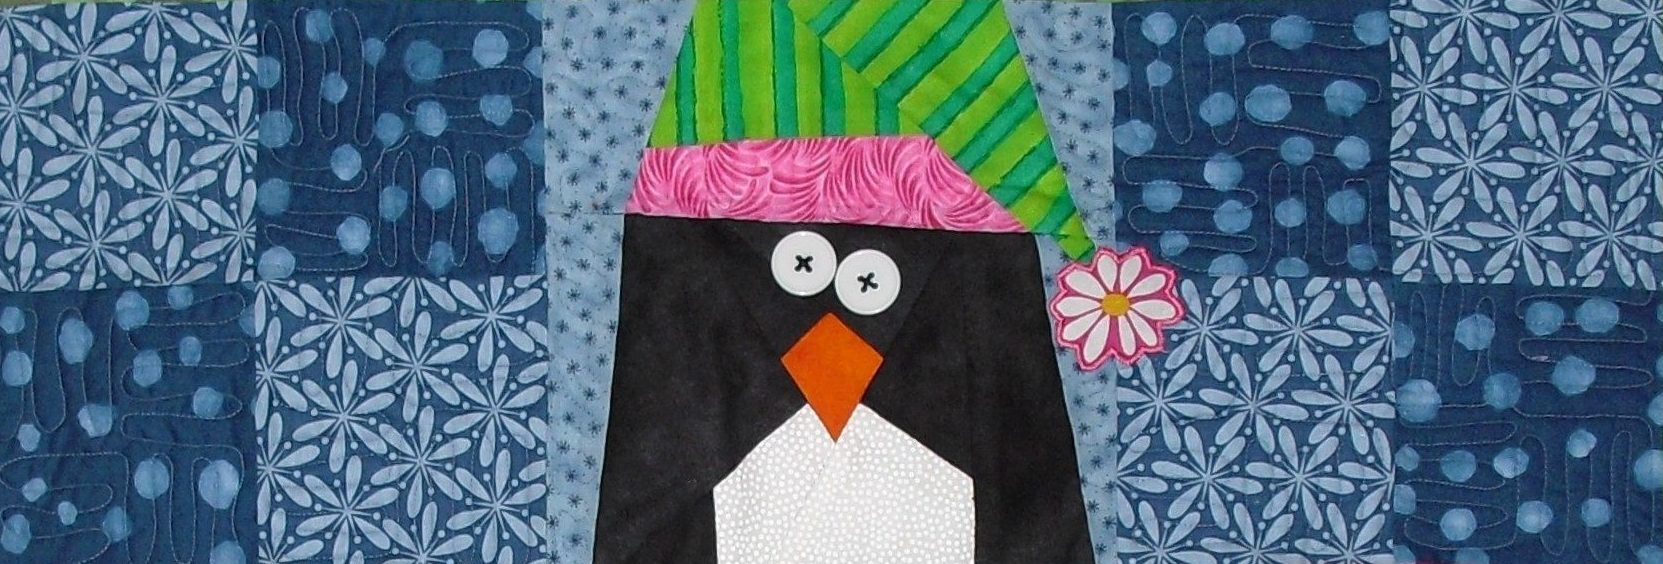
These super sweet penguins wearing a cute collection of different hats make a fun wall hanging or table topper. The penguins are paper pieced, and the flowers are appliqued.
Visit ETSY to find my FREE HALLOWEEN BLOCKS. Be aware that any item I sell on Etsy I am charged 20 cents, even if they are FREE. Therefore, I have to charge my customers the 20 cents or it would cost me a fortune to list a free pattern 🙁
Starting September 3, you can HOP along with our Row Along. Each day designers will be giving FREE patterns for rows that could be used in quilts, table runners, place mats, etc. Each row correlates to a story or fairy tale.
Click to see lots more GIVE-AWAYS. And, hang with me til the end of this post for my Give-Away. Please visit Seams to be Sew to read the rules for our Give-aways.
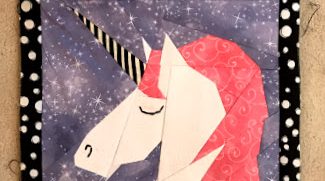
My row is vertical and measures 9″x18″ finished. I was motivated by “The Last Unicorn“, written by Peter Beagle.
DREAM BIG, from Made By Marney
This is a paper pieced pattern and may be purchased here: CLICK HERE TO PURCHASE.
Here’s a clever idea to use this row in a super cute PILLOWCASE. Here is a tutorial to sew your own Dream Big Unicorn Pillowcase. OR, scroll to the end to see my GIVE-AWAY.
Dream Big Unicorn Pillowcase
Where better to DREAM BIG than on your pillowcase, right? NORTHCOTT fabrics have been wonderfully generous in suppling us with fabric for our samples. I am using Northcott White 22 136-10 for my main pillowcase fabric, and scraps for the paper piecing. I use French seams and line the back of the paper pieced part of the pillowcase so there are no exposed seams, as this is an item that will be washed repeatedly. Finished size: 20 1/2″x 28″, fits a standard sized pillow.
Cut these pieces from 1 yard of the main fabric:
2 rectangles 2″x 9 1/2″
1rectangle 7″x 21″
1 rectangle 9″x 21″
2 rectangles 21″x 25″
From 1/3 yard of contrasting color cut:
1 strip 10″ x WOF (width of fabric)
From 1/3 yard of fusible fleece cut:
1 rectangle 9 1/2″x 21 1/2″
Sew the 2″x 9 1/2″ strips to the top and bottom of the paper pieced unicorn.
Remove the paper from the back of the unicorn. Steam press the fusible fleece to the wrong side of the unicorn unit. Quilt as desired (there will only be 2 layers to quilt through instead of the usual 3 layers of fabric).
Use 7″x 21″ fabric.
Pin the 7″x 21″ piece of main fabric to the unicorn unit, with right sides together.
Lining piece.
Trim 1 of the 21″x 25″ pieces of fabric to 11″x 21″. This will be the lining, although I am using the main fabric so as not to waste fabric. Pin this piece over the 7″x 21″ piece, right side of fabric facing down. Stitch through all 3 layers, using a 1/4″ seam allowance.
Press open.
Press the fabric to the right of the unicorn and the seam allowance towards the unicorn.
This is the back view.
Press only the LINING piece over the back of the unicorn.
Turn under excess and press.
Turn under any fabric that extends past the unicorn, and press under to form a hem. You may trim the excess to 1/2″ if preferred. The hem should be even with the raw edge of the unicorn.
Push the lining aside when attaching the left portion of the pillowcase top.
Pin the 9″x 21″ piece of main fabric to the left side edge of the unicorn unit. Sew in place using a 1/4″ seam allowance. Press the fabric open. Press the seam towards the unicorn.
Pin lining in place.
Pin the hem edge of the lining over the seam allowance and pin in place.
This is the back of the pillowcase.
Hand stitch the hem in place. The front of the pillowcase is now finished.
Assemble the pillowcase using French seams. Pin the 21″x 25″ piece of main fabric to the back of the pillowcase, wrong sides together. Sew together using a scant 1/8″ seam allowance.
Turn the pillowcase with the right sides together, press, and sew the same seam again, using a 14″ seam allowance. This encases the previous seam.
Add the Cuff.
Press the 10″x WOF strip AND the pillowcase open flat. Pin the right side of cuff fabric along the 42″ edge of the pillowcase, right side of cuff facing wrong side of pillowcase. Notice how I am skipping the SELVAGE part of the cuff. It will be trimmed later.
Burrito cuff pillowcase.
Ross the pillowcase into a tube that will fit inside of the cuff fabric.
Roll the cuff fabric up and over the pillowcase tube and pin in place.
Here you see how I am matching the edges of cuff fabric and pillowcase fabric and pinning in place. Sew through all layers with a 1/4″ seam allowance.
Pull the pillowcase out of the tube through one of the side edge holes.
Press cuff flat and trim away any excess cuff from both sides of the pillowcase. Now finish sewing the pillowcase together using French seams.
Fold the pillowcase in half, with the right side out and pin the two remaining sides together. Sew a scant 1/8″ seam allowance on these two sides. Turn inside out and press.
Pin the same two edges with the RIGHT SIDES TOGETHER, and sew a 1/4″ seam allowance, encasing the previous seam.
Turn right side out and press flat. How sweet is that? This pillowcase is ready for some BIG dreams!
GIVE-AWAY: Click HERE for the chance to win this Northcott Fat Quarter Bundle, a $20 value.
Now for MY GIVEAWAY. Click to enter to win a FREE paper piece and appliqued pattern to create this super cute UNICORN LAP QUILT. Alphabet letters are included to applique a personalized name on this project, if so desired. This adorable pattern is also available on my Etsy shop. Don’t forget to leave a comment!
=========================================================== Tuesday, October 08, 2019 – SNT
Beth Strand Carol Andrews Carol Swift Cindy Pieters Debra Davis Dione Gardner-Stephen Elizabeth Coughlin Linda Bratten Lydia Midday Marian Pena Nancy Myers Pamela Boatright Paula Gilmore Ursula Prandtstetter
Start getting excited for our 2019 ROW-ALONG, starting on Tuesday, September 3.
All rows will pertain to fairy tales and stories and ALL are FREE downloads. Plus, this year there is a lovely variety of row sizes. The schedule is posted below. My day to post is Thursday, September 5. Here’s a hint…my story has an image that is my top selling subject matter!
=========================================================== Tuesday, October 08, 2019 – SNT
Beth Strand Carol Andrews Carol Swift Cindy Pieters Debra Davis Dione Gardner-Stephen Elizabeth Coughlin Linda Bratten Lydia Midday Marian Pena Nancy Myers Pamela Boatright Paula Gilmore Ursula Prandtstetter
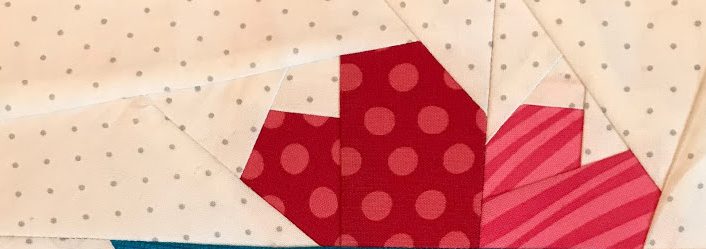
This is an early Valentine’s gift for my wonderful readers. As a thank you to my subscribers, I am offering this FREE Valentine paper pieced pattern.
The LOAD OF LOVE paper pieced block is FREE to all of my wonderful SUBSCRIBERS. You can find the FREE PATTERN HERE: THIS PATTERN IS NO LONGER FREE, BUT CAN BE PURCHASED HERE. LOAD OF LOVE PATTERN
If you are not currently a subscriber, consider signing up in the SUBSCRIBER BOX on the right (if you are on a laptop) or scroll to the last post (if you are on a cell phone). By subscribing, you will be notified by email whenever I add a new post to this website, which is usually once a week. That’s it! Building my list of subscribers is very helpful, especially for my ability to publish my books. So, if you are enjoying my books and want me to write even more of them, please consider subscribing.
Wouldn’t this block make a cute pillow or potholder? Please show me how you use it to create a clever project by emailing me a photo of your creation at: maryannhertel@gmail.com
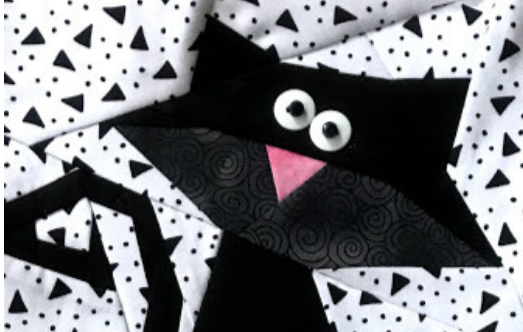
Thanks for joining me today for the first day of the PICK A PUMPKIN BLOG HOP, sponsored by Carla Henton from Creatin in the Sticks. I have been working on one of my favorite subjects, paper pieced black cats and pumpkins. Don’t miss my GIVE-AWAY…you’ll find it at the end of this post.
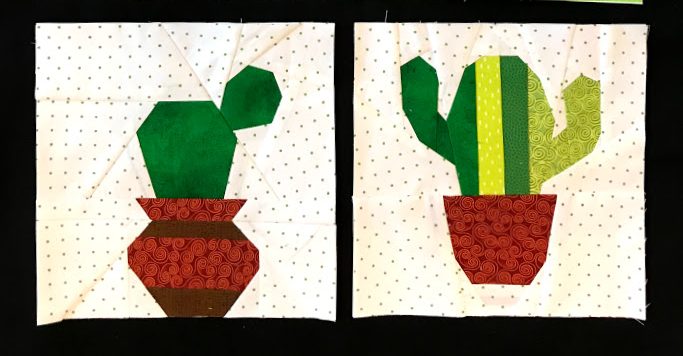
CAT ON A PUMPKIN is an easy block with nice large pieces. Find a lovely orange fabric with some interesting texture for that luscious, fat pumpkin.
Use the cats alone as wall hangings or pillows, or put them all together to create a charming quilt. I call this the CAT’S MEOW QUILT.
WIN THIS PATTERN…Leave a comment for a chance to win this paper pieced pattern. Make sure your email is included in the comment so I can contact the winner. Also, make my day by SUBSCRIBING to my website.
Find more fun fall paper pieced projects on my ETSY or CRAFTSY shops.
Thanks so much for stopping to visit. This is my post for our 2018 Row Along, organized by the fabulous Marian Pena from Seams To Be Sew. We have 54 different quilt bloggers/designers participating this year! And…lots of great FREE STUFF! I am offering a free paper piecing pattern. You will find the incidentals towards the end of this post.
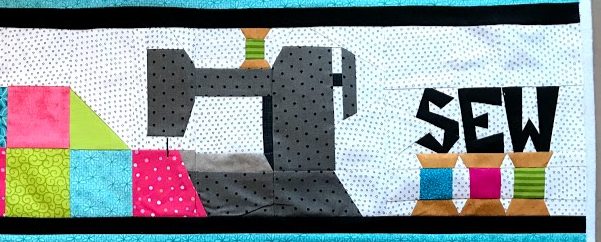
Our theme this year is MY HAPPY PLACE. Here’s my free row…My Sewing Room
. This paper pieced row consists of 4 blocks, each 7 1/2″x 7 1/2″. This makes the entire row measure 7 1/2″ high x 30″ long (finished).
Since there’s no place I would rather be than in my sewing room, I am going to make this row into a wall hanging to place above my sewing machine. If you are new to paper piecing, I suggest you watch one of my paper piecing tutorials.
I have added a 1 1/2″x 30 1/2″ strip of BLACK fabric to the top and bottom of my row. Then added a 4″x 30 1/2″ strip at the top and a 10″x 30 1/2″ along the bottom. These pieces can be adjusted to make your wall hanging any height you want. I have steam pressed a piece of fusible fleece to the back of the entire unit. Then I added a backing piece and quilted the entire unit.
Next I created a row of 5 pockets by sewing 5 squares 6 1/2″x 6 1/2″ together. This unit was also quilted and basted to the bottom of my wall hanging. I sewed between each pocket in the seam “ditch” to separate the pockets.
Then I added black binding…I love it! I added tabs along the top to hang from my existing wooden quilt hanger, but a hanging pocket would also work.
Are you new to paper piecing? I have 2 paper piecing books with great step by step directions, Cute and Clever Totes and Sew Yourself A Merry Little Christmas. Both books are great for beginners, but also have lots of fun paper pieced patterns for intermediate quilters.
I am so EXCITED to explain this Give-Away because it is from the same company that publishes my books, C&T Publishing. They are giving away a $100 Gift Certificate! That means you can choose from SO MANY great C&T books and sewing tools. I can’t say enough about this wonderful company. They allow me and so many other clever designers a chance to create books and products to share with you! This is an awesome prize for 1 lucky person who …
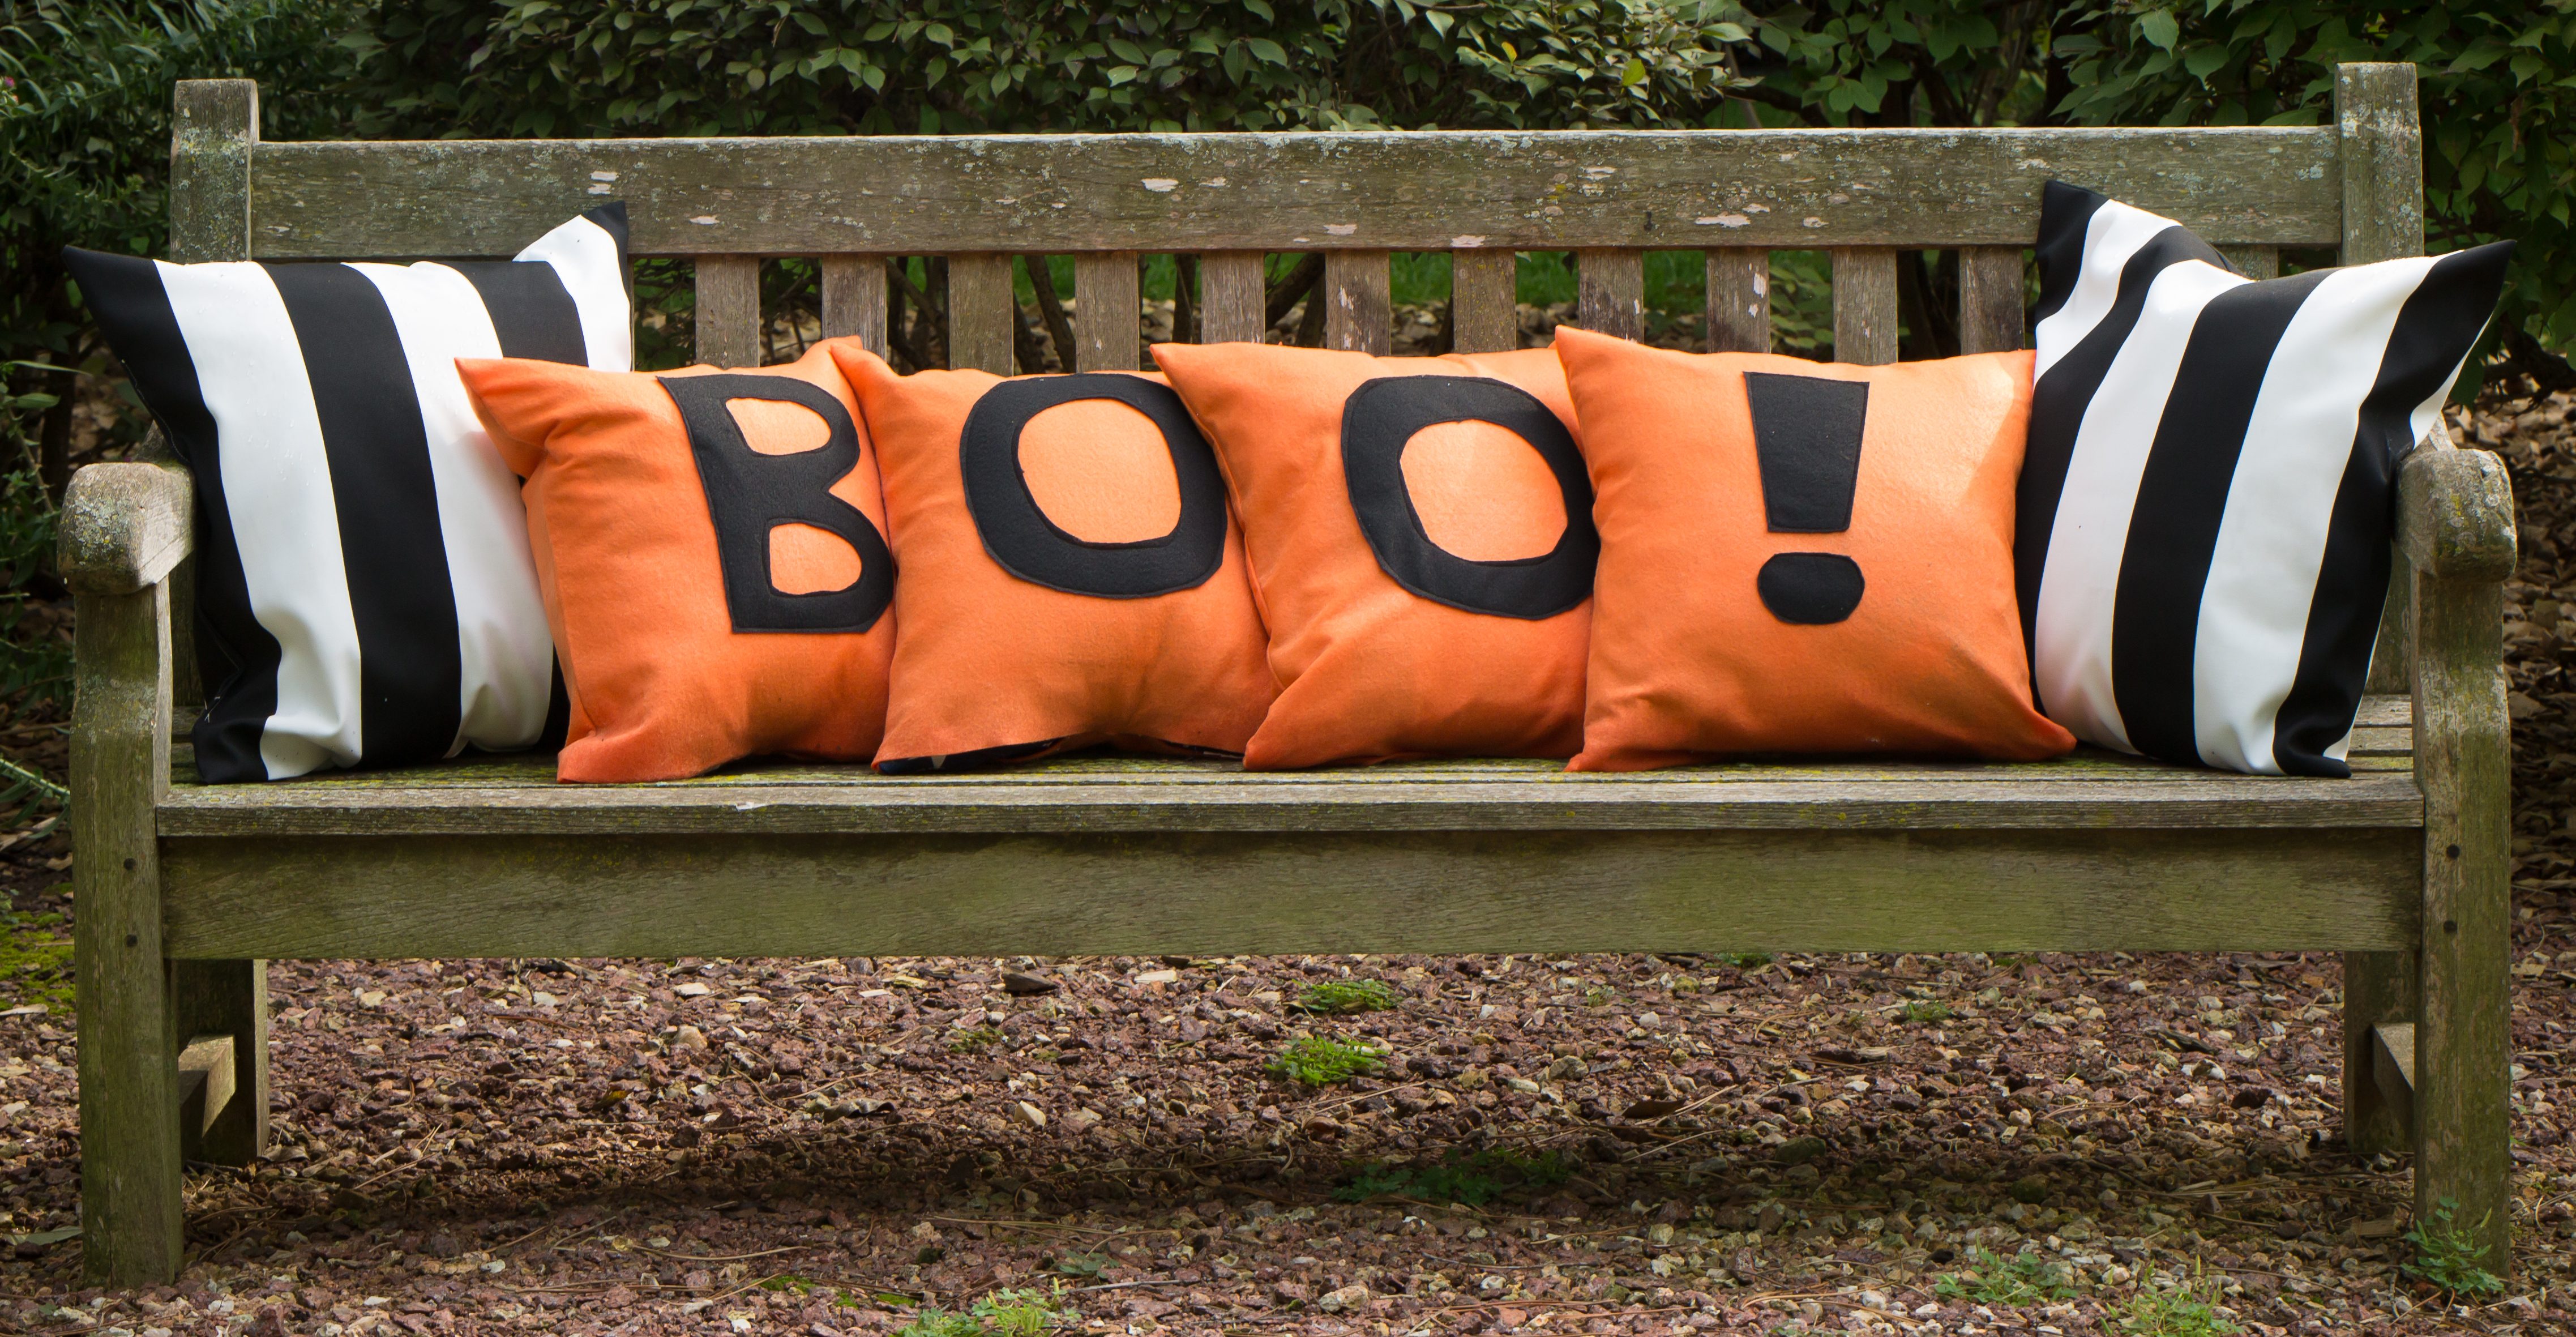
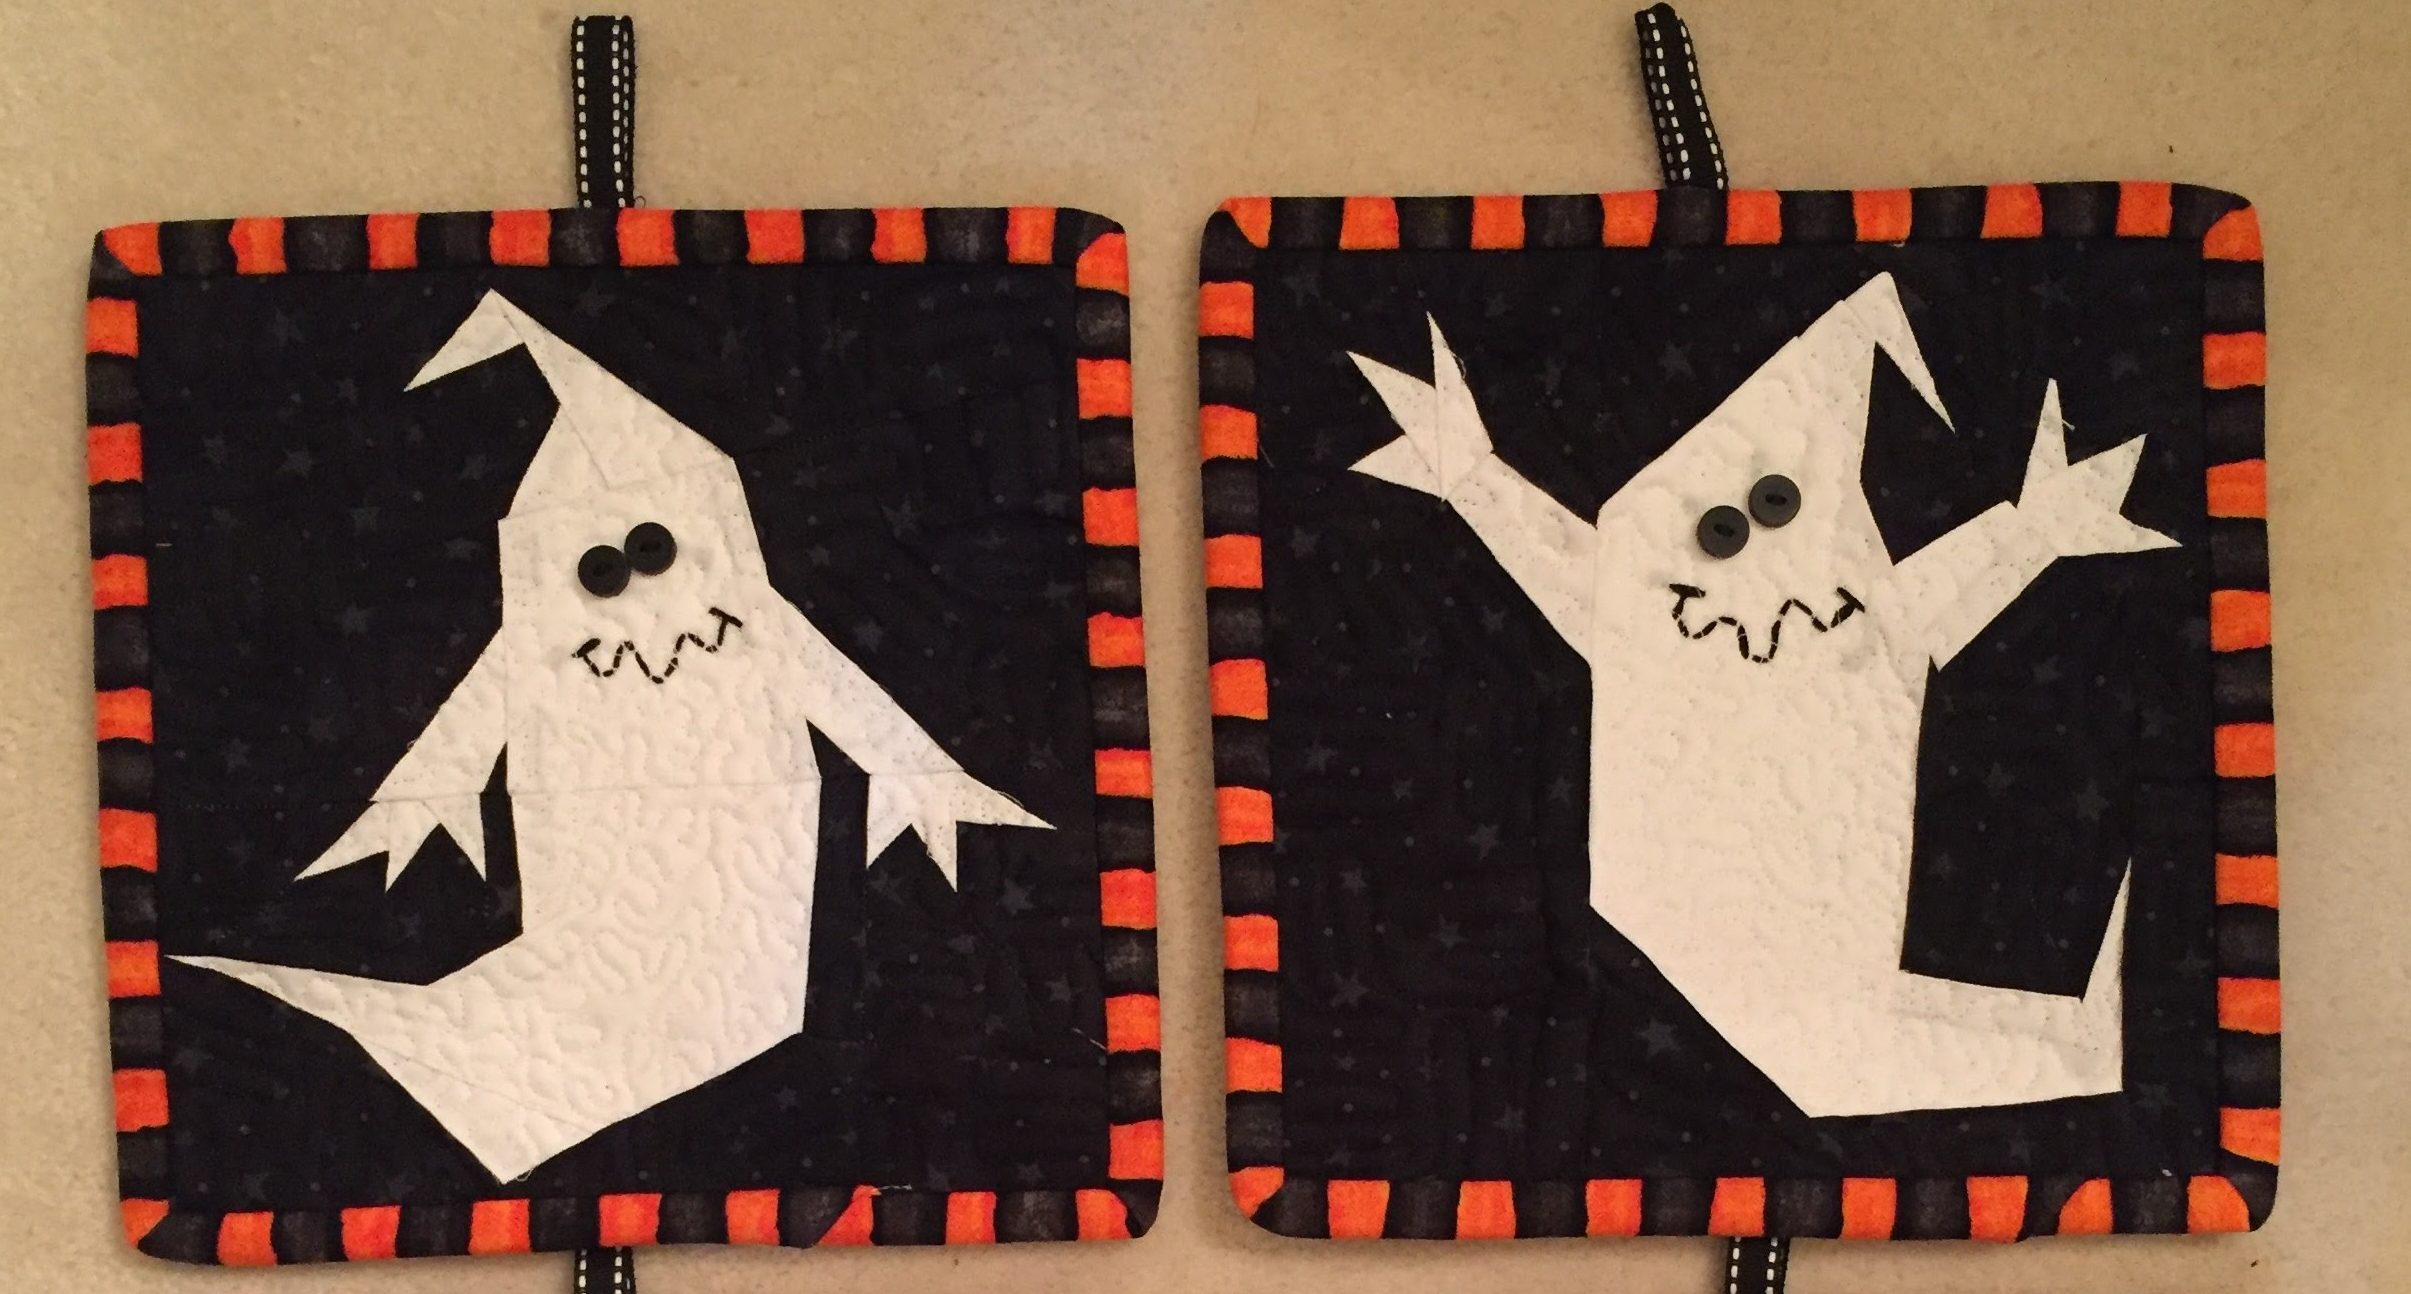
Since it is so close to Halloween, I am GIVING-AWAY this pattern, BOO COLLECTION. This collection of 6 Halloween paper pieced block patterns is so clever! Included with the blocks are patterns for a table runner and potholders. These 8″x 8″ blocks can be used in so many fun ways. Be creative and construct an entire Halloween quilt! Table runner measures 17″ wide x 33″ long. Potholders measure 8″x 8″. This is an original Made By Marney pattern.
Here are some super sweet treat sacks made by a friend using some of the blocks from my BOO Collection. Click on this Rafflecopter link to sign up for the
Rules and Guidelines For Giveaways
Please take the time to read it.
Giveaways offered by sponsors are assigned to the various bloggers for their featured day.
There are no prior announcements on who is doing which sponsor except to the sponsor themselves.
You’ll have to visit the blog or the featured blog to enter the giveaways.
Not all giveaways can be entered at Seams To Be Sew.
I will start announcing winners on September 11, 2018, and finish announcing winners on October 10, 2018.
In most cases, the blog where you won at also will announce their
winners.
You must give a valid email address when you enter the giveaways, any email returned to me, loses the ability to win automatically.
With the exception of Show and Tell Day, all giveaways run for approximately one week.
You are given 3 days to answer the email, if you do not answer within 3 days a new winner will be drawn. Check those spam/junk mail folders, you may miss that winning email if you don’t do so because there are no exceptions to this rule.
If you are notified that you are a winner, in most cases, you will need to provide your name, address, city, state, zip code, country, telephone number, and email address.
In some cases, you will be asked to comment on the blog to enter the giveaway… do the right thing and thank them for the time it took to create the pattern, thank them for the pattern and…
Thank the sponsor by buying their products for the giveaways. This helps them continue to offer great prizes for these types of events. You can also comment on their social media pages. Even if you don’t win, letting them know you love their products is a huge incentive and they really do love hearing from you.
No purchase whatsoever is necessary.
You must be 18+ in order to win a gift.
You are responsible for claiming and paying any tax owed on the value of any gift that you win. Prizes valued at $500.00 should be claimed.
All winners are chosen at random.
All winners will be announced on the blogs via the Rafflecopter entry form and/or post by the blogger at the site where they won and here at Seams To Be Sew. All winners must allow for their first name and first initial of their last name to be announced on this blog.
Odds of Winning a prize are based on a total number of rafflecopter entries during each week and in total for all giveaways.
This giveaway is void where prohibited by law.
Participating bloggers may enter any of the giveaways.
The word giveaways in the rules and guidelines are also known as sweepstakes.
Most of the giveaways are international shipping this year
in some cases, you will be asked to pay for shipping your giveaways.
I am not rich and I do not ask sponsors for money, they provide prizes only.
If they shipped the prize to me, you will be asked to pay for shipping.
All giveaways will be shipped that are in my home within 48 hours of my having heard from you.
An invoice will be sent to you via Paypal, and shipping will take place via Paypal, so your Paypal email will be needed to send the invoice. You will receive a tracking number except for overseas shipments. All shipping will either be first class which averages out at 2.77 to 4.00 up to 13 ounces. Paypal fees are added to that amount to cover that fee. All fabric bundles from Michael Miller, Hoffman, and Moda will be shipped via Priority Mail to protect the fabric itself.
Please note, every effort is made to protect the prizes. They go into a plastic bin when I receive them, and it is covered by an air tight cover. I have a dog in my home and I have a smoker in my home, so I do everything possible to protect the prizes.
Most companies are very good about getting prizes off to customers quickly also, but some companies are overseas, so please allow all sponsors a 2-week time period before you report to me that you still haven’t received your prize. When the company is overseas, it can take 6 weeks to 90 days for an item to also arrive.
Whether or not you read the above, the rules for giveaways are in place to protect everyone. I do not want to hear you didn’t read them, they will be posted on my blog daily during each featured day. There is no excuse for not reading them.
Shelley created this adorable table topper using 8 of my blocks. I have posted her sweet table topper once before, but couldn’t resist sharing again. She was just getting ready to bind this baby, and put it out for Halloween.
Lynne created this funky table runner. I am enjoying her fabric choices! I’d love to see what you are creating for Halloween.
To see all of my Halloween blocks, visit my Etsy or Craftsy shops.
Halloween is just around the corner. If you want to get a jump on some cute seasonal projects, you might enjoy these ideas.
WITCHY PILLOW consists of an 8″x 8″ paper pieced block made into a 17″x 17″ pillow.
If you happen to live in the Utah area, my friend Eva is offering a PAPER PIECING PILLOW CLASS using this pattern. She used the new Halloween fabric line from Studio Fabric, “Me and My Ghoul Friends”. Isn’t it adorable?
So, I hope this motivates you to get started on some sweet Halloween projects! Please remember that when you print a PDF pattern, always select Custom Scale: 100% on your home printer.
You can find more of my Halloween paper piece patterns on Craftsy and Etsy.
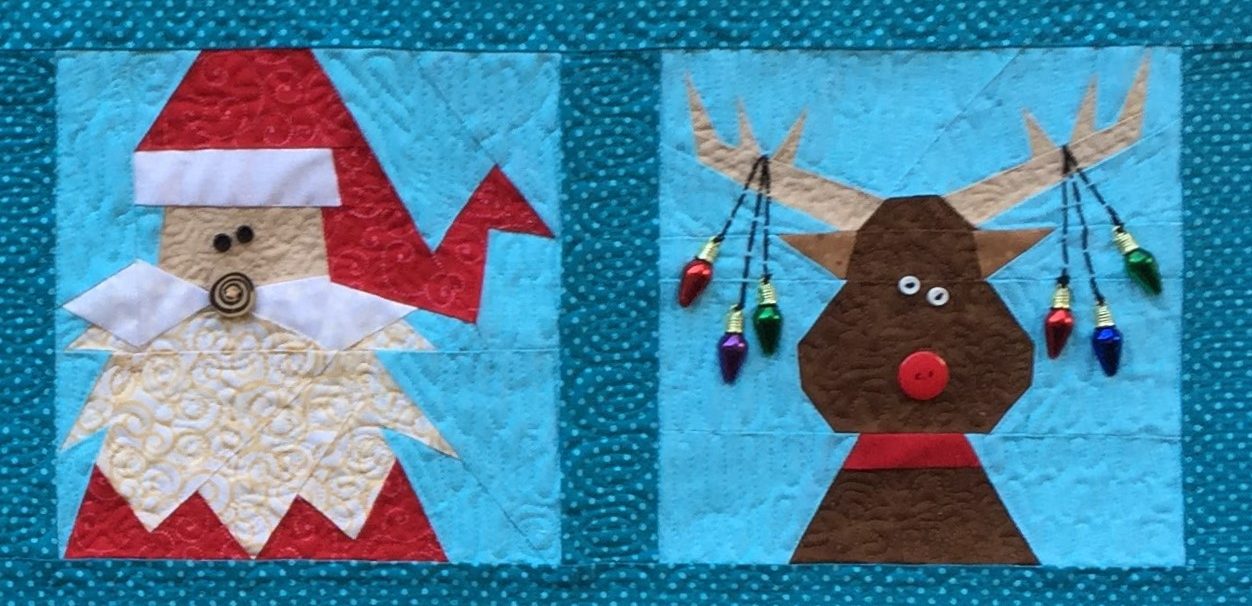
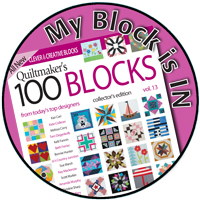
I love designing paper piece patterns for the holidays. I am sharing a tutorial on paper piecing today using one of my new Christmas patterns. “Must Be Santa” can be made into a table runner or pillow if you follow the directions in the pattern. However, you can use the four 7 1/2″x 7 1/2″ blocks in this pattern for any number of projects.
This table runner is made using the four blocks in the pattern, Elf, Mrs. Claus, Santa Claus, and Rudolph. The pillow below is also included in the pattern.
For my tutorial, I will be using this Santa block, but any block in the pattern may be substituted.
I have designed many Santa blocks. This 1 is my favorite. I pride myself in offering very EASY patterns with just a few pieces. This particular block is NOT one of my easy blocks. It has a number of different sections that must be paper pieced separately, then sewn together to complete the block. Don’t let this deter you from trying paper piecing if you are a beginner. Each segment is fairly simple. So…let’s take this 1 step at a time…
Start by setting your stitch length to 1.5; that’s about 20 stitches per inch. Shortening the stitch length perforates the paper so as to make it easier to rip away the paper pattern when you are finished with the block.
Make 4 copies of the original pattern and cut around each segment (outlined in red lines) adding a 1/4″ seam allowance around each segment. Cut segments A/F from copy 1, segments B/E/I from copy 2, segments C/D/G from copy 3, and segment H from copy 4. Above you can see segments A, B, and C with the 1/4″ seam allowance around each piece. Now you are ready to start piecing!
Let’s start with segment A. Pin piece #1 to the appropriate fabric (background color), wrong sides together. There should be at least 1/2″ of excess fabric all the way around piece #1. You can check this by holding your pattern up to a light source.
Trim the excess fabric. Double check: The WRONG SIDE of the fabric should be facing the back of the pattern. This scrap is a 1/2″ larger than piece #1.
Find the stitching line between piece #1 and piece #2.
Use a bookmark or any piece of card stock to fold back piece #2 along this stitching line. It’s a bit hard to see because the bookmark and the back of the pattern are both white, but look closely to see how the pattern is folded.
The Add-A-Quarter ruler is very handy for trimming seam allowances.
Use an “Add-A-Quarter” ruler to trim away the excess fabric, trimming 1/4″ away from the stitching line (fold).
Piece #2 is skin color, so I am using a tea dye fabric. This scrap is a good 1/2″ larger all the way around than piece #2.
Place the pattern on top of the skin colored fabric scrap so the trimmed edges (seam allowances) line up.
Flip the pattern piece back down and pin in place. Sew on the seam line between pieces #1 and #2, starting and stopping your stitching 1/4″ before and after the seam line. There is no need to back tack, as each seam line will eventually be covered by another seam line.
Flip the fabric behind piece #2 and press in place. I also like to pin it flat so there is no movement as you add the next piece.
Looking at the pattern from the front, trim away any excess fabric from piece #2, but be GENEROUS with your seam allowance. I always allow for 1/2″ seam allowance; later to be trimmed to 1/4″. Piece #1 and #2 are now in place. Everything to complete segment A is now repeating these same steps.
Using the bookmark, fold the pattern back on the seam line between piece #2 and piece #3. Do you see that small 1/4″ seam projecting into piece #3…just to the right of my finger?
That little seam needs to be ripped open so the pattern will lay flat when folded back onto the bookmark.
Use the 1/4″ ruler to trim the seam allowance. Use a scrap of white for piece #3.
You can see I am using a sparkly white fabric. Piece #3 is part of Santa’s mustache. Line up the outer edge of the seam allowances, right sides together.
Flip the pattern open and pin in place.
Sew on the line between piece #2 and #3, again start and end 1/4″ before and after the seam line.
Flip the fabric behind piece #3, press, and pin in place.
Trim away the excess scrap of white, leaving a generous 1/2″ around the edges of piece #3.
By using larger scraps and trimming AFTER sewing, you will not have to guess what size to cut your scraps to fit each piece.
Continue in this manner until segment A and B are completed.
Trim the seam allowances that are between segment A and B to 1/4″.
These are the 2 edges that are now trimmed and ready to be pinned together and sewn.
Use a straight pin to poke into and line up the edge of the red seam line on segment A and the corresponding spot on segment B.
Pin the 2 segments together.
Sew on 1/4″ before and after the seam line. Rip away the paper in the seam allowance area on both segments. Open the segments flat and press, pressing both seams to one side or the other, depending on which way they want to lay.
And now for the Give-Away! I will be giving away a free copy of my “Sew Yourself A Merry Little Christmas” book. This book is filled with adorable holiday paper pieced block patterns and 8 different patterns that use the blocks.
These are just a few of the 16 paper pieced blocks in this book.
Due to the extremely high cost of postage overseas, I am only able to mail this book to a customer from the US. If someone wins from a foreign country, I will download this Christmas pattern to them, instead of the book: Must Be Santa Table Runner/Pillow pattern.
For a chance to win the free book (or pattern if you live overseas), leave a COMMENT on this post. Please make sure your email is included. The winner will be announced on Thursday, July 26.
Please visit other participating designers and quilters: